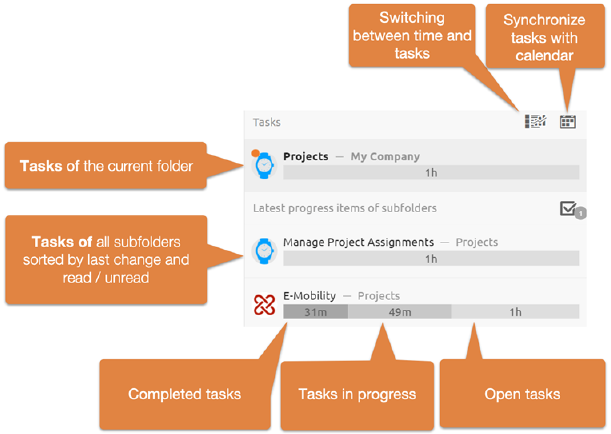
The overview of all task packages is represented by progress bars that take you to the list of individual tasks. Behind each progress bar there are several subtasks, which in turn can consist of further subtasks.

Figure 9: Task overview and progress bar
At the top, the progress of the task list of the current folder is displayed. Below that are the latest tasks of all subfolders. The newest tasks of the subfolders are again divided into unread and read. Unread tasks appear first, below them are read tasks. A click on a progress item opens the corresponding task list and switches to the corresponding subfolder.
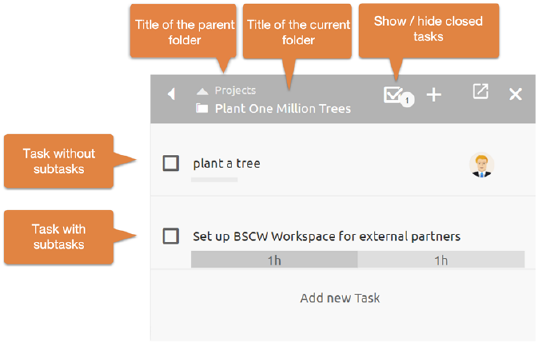
Figure 10: Task list
The task list consists of the list header and the contained tasks of this folder. If tasks in turn contain subtasks, this is indicated by a progress overview of the closed (left), in-progress (center) and open tasks (right).
Each task may in turn contain all BSCW objects such as documents, messages, appointments, a schedule or a description. In the task element, any contents are displayed as follows.
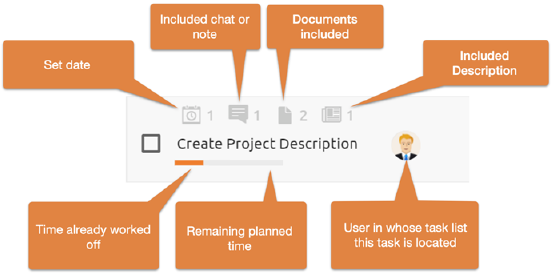
Figure 11: Task element
Clicking on one of the display icons or on a free area of
the task element opens the contents of a task. In the center of a task element,
the title is displayed. This can be edited directly with a mouse click.
The bar below the task title shows the time already worked through in orange and
the estimated remaining time in gray. The elapsed times or the estimated
duration can be adjusted by clicking on the progress bar or via the  .
.
Note: While creating new tasks, the Estimated Duration can also be set via keyboard. To do this, finish entering the title with Ctrl+Enter (Cmd+Enter) to open the Estimated Duration dialog. Further on the input field of the duration gets the keyboard focus, so that you can immediately continue with the input of the time. Finally, the time unit can be adjusted using the keyboard shortcuts "h" or "m".
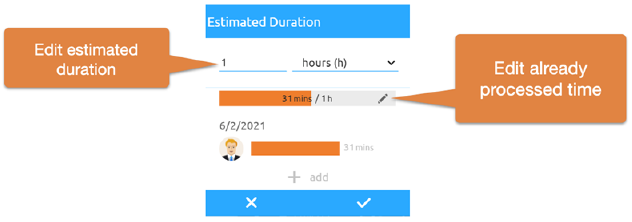
Figure 12: Edit estimated duration
If the mouse pointer is over a task element, further editing options become visible.
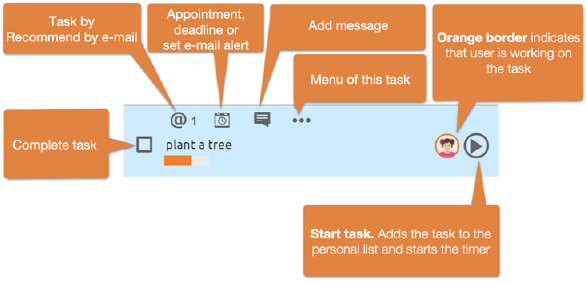
Figure 13: Edit task elements
You can assign an appointment to each task. Based on the time of the appointment and its estimated duration, it can also be displayed in their calendar.
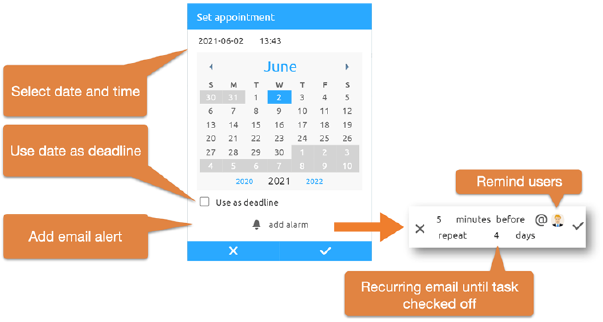
Figure 14: Set deadline or time limit
Add an alarm to an appointment to ensure that the task is processed. In this case, the selected recipient(s) will be reminded of the task by e-mail on the selected date. Here it is possible to set recurring email reminders at a certain interval after the deadline has passed until the task is completed.
Sort tasks into the desired order using DragNDrop. Here, each free area of a task element serves as a drag area. While you are reordering a task, the blue line marks the insertion position.
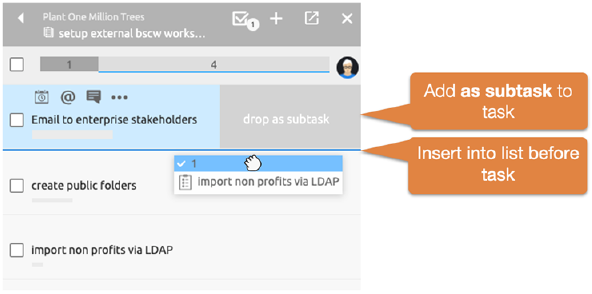
Figure 15: Sort task list via dragNDrop
Note: You can also drag tasks into other tasks and drop them as subtasks. To do this, drag the task into the Subtask area at the side of the target element.
Assign your own tasks by dragging and dropping them into your Personal Task List. As soon as you press the "Start Task" button, the working time will be recorded automatically.
Additional functions can be called up for each task via the
Task menu.  provides detailed information about access
rights and an event history.
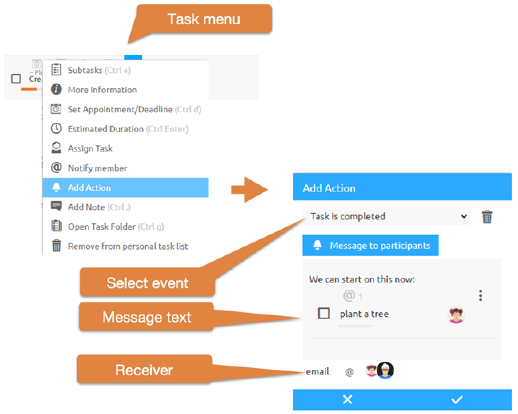
Figure 16: Email notification when task is completed
The entry in the  offers the possibility to automatically
send a message to specific users linked to the closing, opening, starting or
stopping of a task. Other BSCW objects may also be included in this message.